Saturday, 29 October 2011

Scappy buggie blanket tutorial

Well, it has started to get really cold here now and as my LO has outgrown the foot muff for her buggie so we needed an alternative. As I am also completely incapable of throwing anything away I had a pile of scraps of material from my various projects over the years; so to actually make use of these I made this scrappy blanket.

It was super simple to make - just a bit tedious at times.
1. Cut lots of strips of fabric any length you like. Mine were completely random depending on the size of the scrap, mine were also about 2" wide, but again this is totally variable depending on scraps/taste.
2. Sew together strips end-to-end, trying to be completly random (I put them all in a box and just pulled them out and used them, without thinking too much!)
3. Cut down to required length. My finished balnket was 24" wide so I cut the strips to around 27".
4. Iron seams flat, trim long edges to make them straight.
5. Sew down long ends until you make it long enough. My finished blanket was about 40" long.
6. Collect together the rest of the blanket. I used an old pram sheet as backing (which also dictated the size of my blanket) and a layer of cheap fleece in the middle.
7. Lay all the layers together right side out, and cut all the ends down to the final size.
8. Using more of the strips of scraps; pin them right side down along the edges of the blanket.
9. Sew along the edge, making sure to catch all your layers.
10. Fold the trim over the edge, turning the end over, and pin.
11. Sew along the binding, again making every layer is caught.
(This can be done with bias binding, or a plain fabric)

And then it is done. A great way to use up any scraps lying around.

Saturday, 8 October 2011

It's been awhile...

... since I have posted on here, as always life gets in the way of crafting!

As I promised last time here is the picture of my 2nd crochet square for the charity blanket
The blanket has now been put together and is here on the auction page - it is looking fab. I hope it, and the other donated items, raise a great donation for the Stoke Association.

I have also made a tote bag for a friend who won another auction I took part in.
This is a pattern I have used frequently, these bags make great gifts and I love using mine while popping to the supermarket, and have adapted from a sew mama sew tutorial. It has lovely French seams so it doesn't require a lining and you don't have ugly seams on the inside. I have made the straps longer and changed the dimensions of the bag itself slightly, this one is also deeper than normal.

As for my mother-in-law blanket, I am up to 80 flowers!

I am also working on the list of items I plan to make for my homemade Christmas presents - struggling to think of something to make my 20-something sister. I have also been pattern drawing for my mum's weekend bag - I'll get making soon, so watch this space.

Tuesday, 6 September 2011

More crochet....

Well I have now done 35 of the flowers for my mother-in-laws Christmas present, its definately slow going.

I have done another square for The Stoke Association auction blanket, but I can't get the photo on right now - I'll try to update when I get my photos off my phone.

Friday, 26 August 2011

Crochet mad

I am still plodding along with the flowers for my mother in laws Christmas present, up to a grand total of 30 so far! However I have also been working on a couple of other projects, one of which is a square for a blanket being put together for an auction, Stitches for Strokes, which is going to raise money for The Stroke Association.
Quite a simple one to start with (I have a more complex one planned as my second offering). I followed this pattern, with a couple of alterations; I used a 4mm hook with acrylic DK yarn so needed to add a couple of more rounds to get it to 8" square.

Saturday, 13 August 2011

Holiday WIP

Well, I am back from my holiday where I was working on my mother-in-law's Christmas present using this tutorial which was pretty easy to do once I got into the hang of it. I have trimmed down my time to 25 minutes per flower!
This is the yarn I chose, Patons 100% cotton DK, however I am not sure if I will use the yellow shade which is the unopened one. I also used a 3.5mm hook.
This is some of the flowers close up
And all of the flowers I have made so far 19 and an unfinished one
Only 130 odd days til Christmas; I better get working as I think I will need around 120 flowers as well as all the joining white work and borders.

Tuesday, 26 July 2011

Crafty plans

Well I haven't managed to make much recently. I have been practicing crochet including making a little hat to form a pattern; I will be making more for Lisa's stars when I have spare time.

In preparation for going away soon I have been trying to choose a project for the evenings, and have decided to start on my Christmas presents! I am starting with making my Mother-in-law a blanket following this tutorial. Hopefully the yarn I ordered arrives in time.

Monday, 18 July 2011

Travel drawing pad

Well, we are heading off to the Lakes in a few weeks time and C is not a happy traveller, and with the prospect of 6+ hours driving I turned my thoughts to ways to entertain her. She has recently developed a love of drawing so I thought I would make her a handy pad that is reinforced enough for her to write on her lap, and somewhere to store the pencils, and this is what I ended up with.


It was fairly simple to make - especially if you have made a crayon/pencil roll before. The seam allowance is 1/2", and it is made with my possible leftie daughter in mind, so switch the sides for a rightie.

I used 2 different fabrics - a patterned and a plain. The pieces required are:
9.75" x 13.25" plain fabric
10.5" x 13.25" plain fabric
10.5" x 10" patterned fabric
19.5" x 13.25" patterened fabric
5" x 3" plain fabric


Take the smallest patterned piece (10.5x10) in potrait form, fold in half and pin to the bottom of the largest plain piece (10.5x13.25) in potrait format. If you have made a crayon/pencil roll before follow that method. Mark up the patterned piece every 7/8" (for a pencil) and stitch this making sure to reinforce the top edge. I also added an applique on this piece. To finish off turn the 1/2" seam allowance on the left hand side and stitch along the whole length.


To make the closing tab fold the smallest piece in half and stitch along the long edge and one short edge, turn right side out and top stitch all the closed edges.


Now to assemble all the pieces:
My closing tab is affixed using a snap, but you could easily use velcro, ribbon or a button, simply match up where the tab will close on the biggest patterned piece and, in this case, fix snaps to both parts. Folding the patterned piece in half as it would close, turning the fabric where the 1/2" seam allowance would be, place the closing tab in the correct position and pin.

Take two short pieces of elastic and pin across the outer corners of the good side of the patterned piece (on the right hand side of mine) and take the unaltered plain piece and pin this good side down to the right hand side on top of the elastic, turning the seam allowance and pinning.


Place the piece for the pencils and place right side down on the left hand side and pin.

Where the two pieces of plain fabric join - note how the seam allowance on the RH piece is pinned back

Now stitch all the way around.

Turn right side out.

Cut down card/plastic to fit in the pocket created under the unadorned plain fabric, I used a piece of cardboard from an old box topped with a piece of smooth plastic I had kicking around the house to give a nice writing surface.

You can now stitch the pocket closed - if you use a zipper foot you can get close in to the card and this will hold it in tight.

The pocket under the pencil side can be stitched shut or left open - I have left it open as somewhere to keep paper.

And there you have the finished product.

Tuesday, 12 July 2011

Bucket hat

Well I found a use for one of the fabrics; I made a new bucket hat for C from the strawberries fabric and here it is.

Made following this tutorial, which I love.

Friday, 8 July 2011

New fabric

Had a lovely delivery this morning of some new fabric - now I need to decide what to do with it!
Strawberries, Ann Kelle for Robert Kaufman
Phoebe flowers - In the Beginning
Pretty Bird Dancing, Pillow and Maxfield for Michael Miller
Garden on white, Riley Blake
Cool cords Butterfly kiwi green, Robert Kaufman
Blue Sugar and Spice, Riley Blake
Bloom and Grow flower, Riley Blake

Wednesday, 6 July 2011

Simple sun hat

Well my daughters bucket hat - made following this fab tutorial - got lost the other day so I needed to whip up a hat for the next day (yay to the summer sun!) and this is what I came up with.


Firstly the measurements.
  • Measure from ear to ear (or however deep you want the hat)
  • Divide this by 2
  • Decide how big you want the brim
  • Add seam allowance (0.5")
This gives the radius for you hat. I used a piece of ribbon tied to my fabric pen and put a pin in at the radius measurement.


Cut out 2 circles of fabric (plus interfacing the size of the brim if you want it a bit stiff)
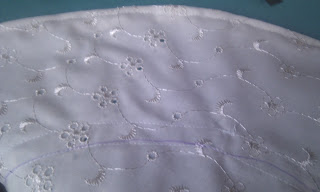
(After adding interfacing to back side)
Put good sides together and sew round the edge of your circles leaving a 3" gap for turning.
Turn right side out and top stitch over opening and around entire hat.


Taking the measurement for the depth of the hat mark another circle on the underside of the hat.
Sew along this mark, sew another circle about 0.5" further out (depending on the width of your elastic).


Cut a small hole in the channel between the stitches on the wrong side only.
Cut elastic to desired length (remembering excess overlap for joining) and thread through the channel.
Join ends of elastic and hand stitch hole closed.


There you have a quick simple summer hat.

Thursday, 30 June 2011

Toddler shorts tutorial

My first tutorial post.


With the nice weather I noticed a gap in C's wardrobe - shorts, so I thought I would make up a simple cotton pair for keeping cool in the summer heat.
These fit my slender 19 month old and her cloth nappy, and include 1/2" seam allowance unless otherwise stated.
  • To make the pattern I started with the back piece. Three sides of a rectangle 8" for the leg seam side, 7.5" across the top, and 9" down the centre seam. The crotch seam was 2.25" at an angle inwards - the size of the angle alters the size of the leg holes which are a gentle curve from the crotch seam to the leg seam. The front piece was copied from the back seam and the centre seam shortened by 1" at the top, the leg seam and centre seam were joined by a line.


  • The waistband was made to fit my 1" elastic, and is a 3.5" x 27" rectangle.
  • The leg cuffs were 2" x 11" rectangles - the size of these depends on the size of your leg holes and whether you want any gather as there are in mine, they can also be thicker, or made using bias binding.

The cut out pieces for the shorts

  • Stitch along the centre seams for the back and front pieces.
  • Stitch along the leg seams to join front and back peices.
  • Stitch the crotch seam, making sure to fold out the centre seams.


  • If you want some gather with your leg cuffs, baste stitch along the edge and gather to the desired size.
     
  • Stitch the short edges of the leg cuffs together, and pin and stitch right sides together round both leg holes (1/4" seam allowance).
     
  • Turn the cuff over the leg hole, turning a further 1/4" over and top stitch around. 


  • Repeat these steps for the waistband - leaving a 3" gap on the inside for threading elastic through.
  • Cut elastic to the correct size for your childs waist allowing for overlap for linking ends. Thread elastic throught the waistband, join ends and then stitch the access hole closed.
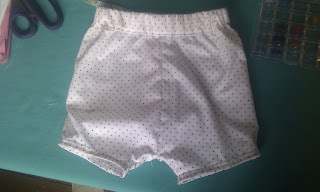
  • And there you are - a pair of toddler shorts.

Wednesday, 29 June 2011

Welcome

Welcome to my new blog. I will be bringing together all my tutorials and my favourite tutorials from elsewhere on the Internet.